Wikipedia

Search results

Friday 8 August 2014

How to Set Up Continuous Integration with Eclipse, Selenium Webdriver, Maven and Hudson

Prerequisites:

1.    Download the latest java jdk from here: http://www.oracle.com/technetwork/java/javase/downloads/index.html
2.    Download the latest build for eclipse(java ee developers) from here: http://www.eclipse.org/downloads/
3.    Download the latest apache maven from here: http://maven.apache.org/download.cgi
4.    Download the latest Hudson from here: http://hudson-ci.org/

Steps:

1.    Install the Java JDK and set the JAVA_HOME environment variable to point to the path where Java JDK was installed (on a windows 7 system the environment variables can be accessed by right clicking your Computer, select Properties, then Advanced system settings, then press the Environment Variables… button)
Environment Variables
2.    Unpack the maven archive, then set the MAVEN_HOME env variable to point to the path where maven was installed
Environment Variables
3.    Set the Path variable to both: %JAVA_HOME%\bin and %MAVEN_HOME%\bin

4.    To check everything is ok, open a command prompt and type: java –version to see the current version of the java jdk installed and also mvn to see if the command is recognized by the system
Command Prompt
5.    Unpack the eclipse archive to a local directory and create a shortcut for it on Desktop and start it
6.    Choose a directory for your workspaces
workspaces
7.    Go to Help -> Eclipse Marketplace and search for m2eclipse, then choose Maven Integration for Eclipse
Eclipse Marketplace
8.    Click Next on the following screen
Eclipse Marketplace
9.    Accept the license and click Finish
Eclipse Marketplace
10.    Restart eclipse
Restart eclipse
11.    Go to the workspaces folder and create a new folder for your project
12.    In that folder copy the following pom.xml file:
Just make sure the versions for:
selenium-java
                2.42.0 and 
junit
4.11 are set to the latest available
13.    Open a command prompt and run “mvn clean install” in that directory where the pom.xml file is located:
command prompt
14.    Wait for the build to be completed, then run “mvn eclipse:eclipse”
mvn eclipse:eclipse
15.    You now have an eclipse project generated for you
Eclipse Marketplace
16.    Go to eclipse, choose File -> Import, then Existing projects into workspace
Existing projects into workspace
17.    Click Next then select the path to the previously created project folder
Import Projects
18.    Your project will be imported and it will look something like this:
Java EE Eclipse 19.    In eclipse right click the project folder and select New-> Source Folder and give it the name: “src” then click Finish
New Source Folder
20.    Select the src folder, right click on it, select New -> Package and give it the name: “test.java”
Java Package
21.    Right click the test.java package and select New -> Class and name it CI_StarterTest, uncheck the Inherited abstract methods option and click Finish (the class name must have the word Test in it!)
New Java Class
22.    Copy the contents of this file in the java class you’ve just created
23.    Your project should now look like this:
Java EE 24.    To make sure everything works fine, go to your project folder and start a command prompt in that folder, the run the command: “mvn clean install”, you should have a successful build
mvn clean install

Hudson configuration

1.    Copy the war file to a directory of your convenience
2.    Create a bat file to run it, call it runHudson.bat, it will contain: “java –jar hudson.war”, I’ve attached it here for you convenience, just copy it to the hudson folder
3.    Run the file and wait for hudson to start
Hudson configuration
4.    You can now access hudson on: http://localhost:8080/
5.    Make sure you check the maven plugins(x3)
maven plugins
6.    Click Install on the bottom of the page
maven plugins
7.    It will take a while… you can take a break while it finishes :)
8.    Click Finish when it is done
Hudson
9.    Hudson is now ready :)
Hudson
10.    Click on New Job link and name it CI
Hudson
11.    On the configuration page, under Advanced Project options check the Use custom space checkbox and paste in the path to your project folder
Hudson
13.    Click Save
14.    Run the build and check the status
Hudson 15.    Congrats, you are all done, now you can move along to add all of sorts of tests in your newly configured CI

Thursday 7 August 2014

Learn Maven

1.  Archetype : Used to create Project with same pattern like Hibernate Project, Web project etc.
command : mvn archetype :generate
2. Compile Project  : Go to folder where POM is place
command : mvn compile
3. Compile and Run Test (Unit Test)
command : mvn test
4. How to compile just test resources
command : mvn test-compile
5. How to create jar file using maven
command : mvn package
6. What are POM files
POM Contains :
·         Information about project
·         Project description
·         Versioning
·         Dependencies
7. List objectives provided by Maven
·         Provide Quality Information
·         Transparent Migration to new features
·         Makes build process easy
·         Uniform building system
 
8. Maven’s Order of inheritance
·         Parent POM
·         Project POM
·         Settings
·         CLI Parameters
9. What are two main subdirectory folder of Maven
·         src
·         target
10. What is target directory used?
                House all output of build
11. What is Groupid
                Entity or organization responsible for producing the artifact
12. What is Artifact id
                Name of artifact
13. What is version
                Version number of artifact

Get total number of rows from a HtmlTable – Webdriver

public static int getRowCount(WebElement element) throws Exception {
try {
WebElement table =element;
@SuppressWarnings(“rawtypes”)
List rows = table.findElements(By.tagName(“tr”));
return rows.size();
} catch (Exception e) {
return -1;
}

Most common functions used in WebDriver to make a web-application testing.

  1. IsElementPresent/Text Present
    1. Finding elements by using function that take argument of By classprivate boolean isElementPresent(WebDriver driver, By by)
      try{
      driver.findElement(by);
      return true;
      }
      catch(Exception e)
      {
      return false;
      }
      }
    2. Using the size to decide whether element is there or not
      if(driver.findElements(Locator).size()>0
      {
      return true
      }else
      {
      return false
      }
      }
    3. Finding the text using the PageSourcedriver.PageSource.Contains("TEXT that you want to see on the page");
  2. Finding WebElement  by using various locators
    1. Using ID  WebElement welement = driver.findElement(By.id("Id from webpage"));
    2. Using Name  WebElement welement = driver.findElement(By.name("Name of WebElement"));
    3. Using Tag Name  WebElement welement = driver.findElement(By.tagName("tag name"));
    4. Using Xpath  WebElement welement = driver.findElement(By.xpath("xpath of  webElement"));
    5. Using CSS  WebElement welement = driver.findElement(By.CSS("CSS locator path"));
    6. Using LinkText  WebElement welement = driver.findElement(By.LinkText("LinkText"));
  3. Fetching pop-up message
    this is the function that would help you in fetching the message

    public static String getPopupMessage(final WebDriver driver) {
    String message = null;
    try {
    Alert alert = driver.switchTo().alert();
    message = alert.getText();
    alert.accept();
    } catch (Exception e) {
    message = null;
    }
    System.out.println("message"+message);
    return message;
    }
  4. Canceling pop-up
    public static String cancelPopupMessageBox(final WebDriver driver) {
    String message = null;
    try {
    Alert alert = driver.switchTo().alert();
    message = alert.getText();
    alert.dismiss();
    } catch (Exception e) {
    message = null;
    }
    return message;
    }
  5. Inserting string in Text Fieldpublic static void insertText(WebDriver driver, By locator, String value) {
    WebElement field = driver.findElement(locator);
    field.clear();
    field.sendKeys(value);
    }
  6. Reading ToolTip text
    public static String tooltipText(WebDriver driver, By locator){
    String tooltip = driver.findElement(locator).getAttribute("title");
    return tooltip;
    }
  7. Selecting Radio Button
    public static void selectRadioButton(WebDriver driver, By locator, String value){ List select = driver.findElements(locator);
    for (WebElement element : select)
    {
    if (element.getAttribute("value").equalsIgnoreCase(value)){
    element.click();
    }
    }
  8.  Selecting CheckBox

    public static void selectCheckboxes(WebDriver driver, By locator,String value)
    {
    List abc = driver.findElements(locator);
    List list = new ArrayListArrays.asList(value.split(",")));
    for (String check : list){
    for (WebElement chk : abc){
    if(chk.getAttribute("value").equalsIgnoreCase(check)){
    chk.click();
    }}}}
  9. Selecting Dropdownpublic static void selectDropdown(WebDriver driver, By locator, String value){
    new Select (driver.findElement(locator)).selectByVisibleText(value); }
  10. Selecting searched dropdownpublic static void selectSearchDropdown(WebDriver driver, By locator, String value){
    driver.findElement(locator).click();
    driver.findElement(locator).sendKeys(value);
    driver.findElement(locator).sendKeys(Keys.TAB);
    }
  11. Uploading filepublic static void uploadFile(WebDriver driver, By locator, String path){
    driver.findElement(locator).sendKeys(path);
    }
  12. Downloading fileHere we will click on a link and will download the file with a predefined name at some specified location.
    public static void downloadFile(String href, String fileName) throws Exception{
    URL url = null;
    URLConnection con = null;
    int i;
    url = new URL(href);
    con = url.openConnection();
    // Here we are specifying the location where we really want to save the file.
    File file = new File(".//OutputData//" + fileName);
    BufferedInputStream bis = new BufferedInputStream(con.getInputStream());
    BufferedOutputStream bos = new BufferedOutputStream(
    new FileOutputStream(file));
    while ((i = bis.read()) != -1) {
    bos.write(i);
    }
    bos.flush();
    bis.close();
  13. Wait()
    1. Implicit Wait :
      driver.manage.timeouts().implicitlyWait(10,TimeUnit.SECONDS);
    2. Explicit Wait:WebDriverWait wait = new WebDriverWait(driver,10);
      wait.until(ExpectedConditons.elementToBeClickable(By.id/xpath/name("locator"));
    3.  Using Sleep method of java
      Thread.sleep(time in milisecond)
  14. Navigation method of WebDriver Interface

    1. to() method (its a alternative of get() method)
      driver.navigate().to(Url);
      This will open the URL that you have inserted as argument
    2. back() – use to navigate one step back from current position in recent history syntax == driver.navigate().back();
    3. forward() – use to navigate one step forward in browser historydriver.navigate().forward();
    4. refresh() – This will refresh you current open urldriver.navigate().refresh();
  15. Deleting all Cookies before doing any kind of action  driver.manage().deleteAllCookies();
    This will delete all cookies
  16. Pressing any Keyboard key using Action builder class of WebDriverWebDriver has rewarded us with one class Action to handle all keyboard and Mouse action. While creating a action builder its constructor takes WebDriver as argument. Here I am taking example of pressing Control key
    Actions builder = new Actions(driver);
    builder.keyDown(Keys.CONTROL).click(someElement).click(someOtherElement).keyUp(Keys.CONTROL).build().perform();
    When we press multiple keys or action together then we need to bind all in a single command by using build() method and perform() method intend us to perform the action.
    In the same way you can handle other key actions.
  17. Drag and Drop action in Webdriver
    In this we need to specify both WebElement means Source and target and for draganddrop Action class has a method with two argument so let see how it normally look like
    WebElement element = driver.findElement(By.name("source"));
    WebElement target = driver.findElement(By.name("target"));
    (new Actions(driver)).dragAndDrop(element, target).perform();

ADB is Not Recognized as an internal or external command Fix

Some of you are facing problems with Path, because of that you will see the error as below. Even though it is basic lot of people asking this same question. Hence posting this tutorial to fix this error.

In Windows --> Click Start --> Run --> cmd

When you run adb in the command prompt you will see an error as below

Microsoft Windows [Version 6.2.9200]
(c) 2012 Microsoft Corporation. All rights reserved.

C:\Users\raj>adb
'adb' is not recognized as an internal or external command,
operable program or batch file.


To fix this error you need the Android SDK if you don't have it please follow the steps below,
Open the browser and navigate to http://developer.android.com/index.html

Click the Get the SDK as shown in the above image
Click Download the SDK as shown in the above image
Check the checkbox for the license agreement, Select 32 or 64 bit based on your operating systtem.
Click the download SDK link.
Wait patiently until the download is complete.
My machine is a 64 bit Windows, hence the file downloaded is adt-bundle-windows-x86_64-20130219.zip
The zip file contains the following folders eclipse & sdk.
I have extracted to the following location in my machine
Hence i have the following in the path 
C:\Users\rajb\Downloads\adt-bundle-windows-x86_64\sdk\platform-tools
C:\Users\rajb\Downloads\adt-bundle-windows-x86_64\sdk\tools

To Fix it permanently set in the environment variable 

Right Click My Computer --> Click Properties 
Click Advanced System Settings 
Click Environment Variables
Click New  as below, 
Variable name: ANDROID_PLATFORM_TOOLS

Variable Value: C:\Users\rajb\Downloads\adt-bundle-windows-x86_64\sdk\platform-tools
Variable name: ANDROID_TOOLS

Variable Value: C:\Users\rajb\Downloads\adt-bundle-windows-x86_64\sdk\tools

Edit the Path variable if it exist, else create a new variable Path 
Variable name: Path

Variable Value: %Path%;%ANDROID_PLATFORM_TOOLS%;%ANDROID_TOOLS%

adb should be working on command prompt and 'adb' is not recognized as an internal or external command,
operable program or batch file is resolved now.

 Connect the device with USB then from the command line 


Sunday 3 August 2014

Writing first script using Webdriver

Now we are ready to start our first script in Webdriver using Eclipse .Open your Eclipse and follow the below steps

1.Create new Java Project
2.Add the Webdriver Jar files to the created Project
3.Create a new Package under Java Project
4.Create a Java class file under the Package
5.Write the code in the Java class file and run it.

1. Create a new Java project

Goto File >> New >>Java Project
We will get a popup which will prompt us to provide the project name.
Give the project name say "ExploreWebDriver" then click on Finish button.

Vamshi Kurra - New java project creation popup in Eclipse

2.Add the Webdriver Jar files to the created Project

Right click on created project then goto
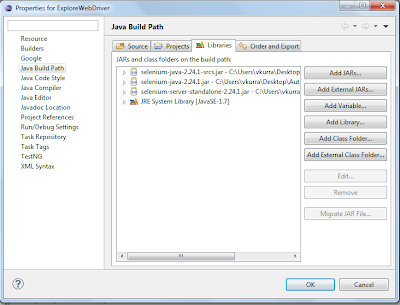
Build Path>>Configure Build Path >>Select Libraries tab>>Add External jars
Which will open a folder search prompt , goto the locations where you have downloaded WebDriver jar files and add them .Then click on "Ok" button
You need to add below jar files.If you don't have these files downloaded on your computer then you can download them from the below pages :
http://seleniumhq.org/download/
http://code.google.com/p/selenium/downloads/list
You can also download all jars from my shared location
https://docs.google.com/folder/d/0B00rtzEfza2uZnRBZnNVWHFVNjA/edit
  • a.selenium-java-2.45.0-srcs.jar
  • b.selenium-java-2.45.0.jar
  • c.selenium-server-standalone-2.32.0.jar

Vamshi Kurra- Adding External jar files in Eclipse

3.Create a new Package under Java Project

 Goto creatd project  i.e. "ExploreWebDriver" and expand it.Now we will see a separate folder named "src". Right Click on it and then Goto
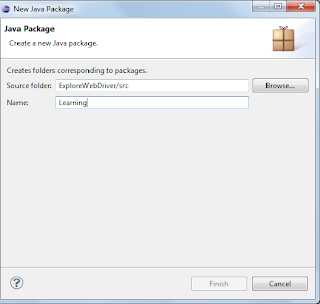
New>>Package>>Give the name of package in the "package creation" popup. Say "learning" is the name of the Package.Now click on finish button.

Vamshi Kurra - New Java Package popup
4.Create a Java class file under the Package

Right click on the created package i.e "Learing" and then goto
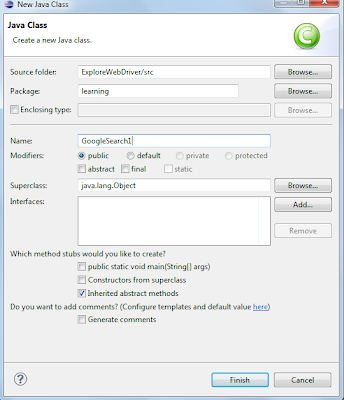
New>>Class>>we will get "New Java Class" popup. Enter the name of the class say "GoogleSearch" and click on Finish.
Vamshi Kurra- Adding new Java Class in Eclipse

5.Write the code in the Java class file and run it.

Copy the below code and paste it in the created Java class file.
  1. package learning;  
  2.   
  3. import org.openqa.selenium.WebDriver;  
  4. import org.openqa.selenium.firefox.FirefoxDriver;  
  5.   
  6. public class GoogleSearch {  
  7.    
  8.  public static void main(String args[]){  
  9.   WebDriver driver=new FirefoxDriver();  
  10.   System.out.println("Loading Google search page");  
  11.   driver.get("http://google.com");  
  12.   System.out.println("Google search page loaded fine");   
  13.  }  
  14.   
  15. }  

Here is how your Eclipse project hierarchy looks like :

Vamshi Kurra- Eclipse project hierarchy
Now Click run .
Script will run successfully and a new firefox window will be opened with the Google.com .